|
Step-by-Step Tutorial for Brown Car Wrap Application
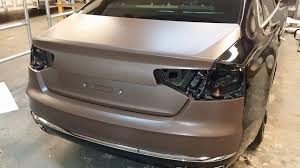
Are you ready to give your car a fresh new look with a Brown Car Wrap? With the right tools and a step-by-step guide, you can achieve a professional-looking finish right in your own garage. Follow this tutorial for a smooth and successful brown car wrap application.
Step 1: Gather Your Materials
Before you begin, make sure you have all the necessary materials on hand. You will need a brown car wrap vinyl, a squeegee, a heat gun, a sharp knife or blade, rubbing alcohol, microfiber cloths, and masking tape. It's important to use high-quality materials to ensure a durable and long-lasting finish.
Step 2: Clean and Prepare the Surface
Start by thoroughly cleaning the surface of your car with soap and water to remove any dirt, grime, and wax. Once the surface is clean and dry, use rubbing alcohol to further remove any remaining residue. This step is crucial for ensuring proper adhesion of the vinyl wrap.
Step 3: Measure and Cut the Vinyl
Carefully measure the surface area of the car that you will be wrapping. Use these measurements to cut the brown car wrap vinyl to the appropriate size, leaving some excess around the edges to ensure full coverage. It's better to have more vinyl than you need than to come up short.
Step 4: Apply the Vinyl
Peel off a small portion of the backing from the vinyl wrap and carefully align it with the desired area on your car. Use masking tape to hold the vinyl in place as you work. Once the vinyl is positioned correctly, use a squeegee to smooth out any air bubbles and ensure a tight bond with the surface of the car.
Step 5: Use Heat to Mold the Vinyl
As you work your way around the car, use a heat gun to gently warm the vinyl. This will make it more pliable and allow you to stretch and mold it around curves and contours for a seamless finish. Take your time with this step to avoid wrinkles or creases in the vinyl.(Black Vinyl Wrap)
Step 6: Trim Excess Vinyl
Once the vinyl is applied to the entire surface of the car, use a sharp knife or blade to carefully trim away the excess material along the edges. Take care to make clean and precise cuts for a professional-looking result.
Step 7: Final Touches
After trimming, go over the entire wrapped area with a heat gun and squeegee once more to ensure that the vinyl is securely bonded to the car's surface. Use a microfiber cloth to gently buff the wrap and remove any remaining air bubbles or imperfections.
With these simple steps, you can achieve a stunning brown car wrap that will give your vehicle a whole new personality. Take your time, follow each step carefully, and enjoy the transformation as your car takes on a fresh new look.
|